Version 0.8 released

This is the library release. There are a few bug fixes and changes of behaviour for the mosquitto and the clients, but the significant part of this release is the new mosquitto MQTT client library. The library comes in three flavours: the C library, which is the main library, and C++ and Python bindings. If you're interested in helping add bindings for your favourite language, please get in touch.

The library interface (API) is to be considered experimental, although I believe the C and C++ APIs to be complete and sane. The Python bindings are a naïve attempt by a C programmer and will definitely be changing in the future to something more pythonic. I'd be extremely grateful for help from experienced python programmers to this end.

The documentation of the library is currently ongoing... There is an overview of most of the function calls and an example in the libmosquitto.3 man page, but complete coverage can be found in the mosquitto.h man page. This, combined with the class details in mosquittopp.h can be used to help use the C++ library. The python module isn't documented due to its extremely changeable state, but there is an example in the python directory.

Other changes:

  • Topics starting with a / are treated as distinct to those not starting with a /. For example, /topic/path is different to topic/path. This matches the behaviour of rsmb.
  • Correctly calculate the will QoS on a new client connection (bug #597451).
  • Add "addresses" configuration file variable as an alias of "address", for better rsmb compatibility.
  • Bridge clean_session setting is now false, to give more sensible behaviour and be more compatible with rsmb.
  • Add cleansession variable for configuring bridges.
  • Add keepalive_interval variable for bridges.
  • Remove default topic subscription for mosquitto_sub because the old behaviour was too confusing.
  • Added a C client library, which the pub and sub clients now use.
  • Added a C++ client library (bound to the C library).
  • Added a Python client library (bound to the C library).
  • Added CMake build scripts to allow the library and clients (not the broker) to be compiled natively on Windows.

Get it from the download page.

The change to using a library means that packaging mosquitto for distros is a lot more complex. This is stretching my packaging experience, so please bear with me on that front! Mosquitto will now likely consist of a number of different packages on Ubuntu at least:

  • mosquitto (the broker)
  • mosquitto-clients (mosquitto_sub, mosquitto_pub)
  • libmosquitto0 (C library)
  • libmosquitto0-dev (C library development files)
  • libmosquittopp0 (C++ library)
  • libmosquittopp0-dev (C++ library development files)
  • libmosquitto-python (Python binding)

Update

I've been getting a few questions about the python interface. This isn't currently packaged for Ubuntu, but hopefully will be soon. There are basic python examples in the downloads at lib/python/sub.py and misc/currentcost/gnome-panel/CurrentCostMQTT.py


MQTT client library

I have been working on a client library for MQTT for the next release of Mosquitto. It is now at a stage where it is usable and ready for wider testing. There isn't any documentation yet (!) so it's only available in the source repository at http://bitbucket.org/oojah/mosquitto. Use the "get source" link in the top right corner of the page to download a snapshot. If you're interested in developing your own open source MQTT clients, it'd be great if you could take a look to make sure the interface is sane before I make a release!

The library itself is written in C, with bindings for C++ and Python.

I plan to package it up in a more easy to access form in the not too distant future, hopefully with some documentation as well.

Update

I've put the start of a man page online, which shows an example of using libmosquitto to subscribe to a topic and print the results: libmosquitto.3.


Mosquitto on openSUSE 11.3

The upcoming release of openSUSE, version 11.3, includes extension support for sqlite3 which means it now has everything required for mosquitto.

I've created packages for this new version of openSUSE and details can be found on the download page. You just need to wait three days until the release of 11.3!


Version 0.7 released

This is a new features release. Note that although the number of changes is relatively small, there is a fairly major change in the network socket handling (to allow >1024 clients) , which is one reason this has been treated as a separate release.

Changes:

  • Use poll() instead of select() to allow >1024 clients.
  • Implement max_connections.
  • Run VACUUM on in-memory database on receiving SIGUSR2.
  • mosquitto_pub can now send null (zero length) messages.
  • Add option to print debug messages in pub and sub clients.
  • hg revision is now exported via $SYS/broker/changeset
  • Add compile time option to disable heap memory tracking.

Bug fixes:

  • Don't store QoS=0 messages for disconnected clients with subscriptions of QoS>0.
  • accept() all available sockets when new clients are connecting, rather than just one (performance advantage)
  • Send Will when client exceeds keepalive timer and is disconnected.
  • Check to see if a client has a will before sending it.
  • Correctly deal with clients connecting with the same id multiple times.
  • Fix bridge keepalive timeouts and reconnects.
  • Don't attempt to drop root privileges when running on Windows as this isn't well supported (bug #586231).

Source downloads are available at the download page Links for binary packages on Ubuntu and Fedora can be found on the same page.


Google Powermeter : Step by step

Note: Google Powermeter is now defunct but this post will remain here for those interested.

This is a follow up to my previous post on using Google Powermeter, but this time I'm going to give a step by step guide to getting your data uploaded. The only assumptions are that you have a CurrentCost monitor (note that CurrentCost monitors are often rebadged by electricity suppliers such as EON in the UK so check yours) and have already connected it to your computer, want to use MQTT and that you're using Linux, or another Unix operating system.

Retrieving the data

The first step is to get the data from the CurrentCost into the MQTT broker. This is straightforward - simply read data from the serial port and send it all to the broker. I have scripts to do this with mosquitto in both perl and python.

The data coming from the CurrentCost is in XML format and as well as providing the real time power reading every 6 seconds, will also send historical data periodically. I'm only going to deal with the real time readings here. The next step is to reprocess the incoming data into something more manageable, then republish it. An example of doing that is the script cc128_parse.pl, which assumes you're only using the main channel from the CurrentCost. If you have multiple monitoring channels, you'll need to modify it to suit.

Logging the data

Google limits the number of times we can send data to 6 per hour, so we have to log the data and then send amalgamated updates. I use mysql for this - I'm going to assume that you've got it installed and running. Log into the mysql console using "mysql -u root",  "mysql -u root -p" if you know the password, or possibly "sudo mysql". We're now going to create a database and table to hold the powermeter data, then add a user to access and update the data.

To create the database and table enter the following:

CREATE DATABASE powermeter;
USE 'powermeter';
CREATE TABLE powermeter (
  `id` INT NOT NULL auto_increment,
  `timestamp` INT NOT NULL,
  `temperature` FLOAT NOT NULL DEFAULT 0.0,
  `ch1` INT NOT NULL DEFAULT 0,
  PRIMARY KEY (`id`),
  UNIQUE KEY `timestamp` (`timestamp`)
) ENGINE=InnoDB DEFAULT CHARSET=utf8;</pre>

Note that there's a column there for the temperature as well.

To add the user and grant access to the database:

CREATE USER 'powermeter'@'localhost' IDENTIFIED BY '&lt;your password&gt;';
GRANT ALL ON powermeter.* to 'powermeter'@'localhost';

Finally, you'll need to get data into this database. My script cc128_log_mysql.pl subscribes to the data from cc128_parse.pl and logs it into the database. You'll need to edit it to have the correct database details.

If you already have your power data published to an MQTT topic, it's quite likely that you won't have it in the same format that I use above. If this is the case, you will need to modify cc128_log_mysql.pl. Assuming your data coming in over MQTT is just the power reading, then you can replace this:

@vals = split(/,/, $line);
$timestamp = @vals[0];
$temperature = @vals[1];
$ch1 = @vals[2];

with this:

$timestamp = time();
$temperature = 0;
$ch1 = $line;

You can of course leave the temperature column out completely if you prefer.

Registering with Google Powermeter

Before you can send any data to Google, you need to register your device with them. This would normally be done automatically by your device, but because we're doing things ourselves we need to do it manually. See 2cheap2meter and the links it provides for more details.

We first need to decide on a few parameters for our device:

  • Manufacturer (e.g. CurrentCost)
  • Device model (e.g. CC128 or Envi)
  • Device id (e.g. Serial number or your own made up string, 1234)
  • Number of channels to log (e.g. 1)

We can then construct an address which you will paste into your web browser:

https://www.google.com/powermeter/device/activate?mfg=CurrentCost&amp;model=CC128&amp;did=1234&amp;dvars=1

dvars here is the number of channels (or monitors) that we wish to register. If you have more than one channel logging, change the number accordingly - bear in mind that you'll have to modify just about everything else in this post to match. You will need to remember the values you put here for later.

Visiting that link will take you to the activation page, which you should complete. After you have done this, you will be presented with authorisation information for your new device. The piece of information we need is the 32 character string contained between "token=" and "&path" (the authorisation token) as well as the 20 digit number after "&path=/user/" (your google powermeter id).

Sending the data

I have a script google_powermeter_update.pl that will query the database for readings from the past 15 minutes and then send them. You'll need to edit the script to put the correct database details, power meter id, authorisation token and device details. To set it to run every fifteen minutes, I use cron. Either add an entry to your own crontab by running "crontab -e" then entering the following line:

*/15 * * * * /path/to/google_powermeter_update.pl &gt; /dev/null

Or by creating a file containing the line below and copying it to /etc/cron.d/powermeter_update.cron.

*/15 * * * * nobody /path/to/google_powermeter_update.pl &gt; /dev/null

In both cases, you can change the output redirection from "/dev/null" to e.g. "/tmp/powermeter" to allow you to check any error codes in case of a problem.

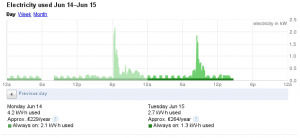
Now go to http://www.google.com/powermeter/site/ to check your data! Here's an example of mine:

powermeter example

Possible changes

The above description and scripts aren't ideal - if you lose your internet connection then data will still be recorded but won't be sent to google. One possible change would be to add a column to the database to list whether that particular piece of data had been sent or not, which would allow all data to eventually be sent and deleted afterwards if desired.

A second way around this would be to make use of the historical data that the CurrentCost monitors use. This could also be a way of reducing the need to log things ourselves.

Conclusion

I hope this is of use to you - please let me know if you have any problems with any of the above steps.


Automation: Has the oven warmed up yet?

In the Bang Goes the Theory episode The Human Power Station a family of four people had their electricity supplied by a large group of cyclists on cycles hooked up to generators, the point being to highlight the amount of energy that is used and wasted on a daily basis. There's a video on youtube.

One example that seemed to waste a lot of energy was cooking roast dinner. The oven was turned on to preheat (this is often the first instruction in a recipe), but it wasn't actually used until a significant time later, wasting a lot of energy. An example which may be more common is turning the oven on to preheat before cooking frozen food (which requires no preparation), then forgetting to check to see if it has preheated.

This used to happen to me, but I've solved the problem by using my electricity monitor (I have an electric oven), mqtt and asterisk.

First off, we need to monitor electricity usage. I do this with a CurrentCost CC128 (note that EON customers in the UK can apply to get one of these for free in an Energy Fit pack) hooked up to a low power computer that is running mosquitto. If you're running Linux, you can use cc128_read.py or cc128_read.pl to read the data coming from the monitor and publish it to an mqtt broker. A second client, [cc128_parse.pl], takes the data from the monitor and republishes it to the broker in a friendlier format - the Unix timestamp of the reading and the power usage, separated by a single space.

To figure out when the oven has warmed up, I look at the electricity usage with the oven heater on - approximately 2.4kW. If the energy usage drops below this value, I know that the oven heater has turned off and so the oven has warmed up. This is of course slightly simplistic - I'm not actually measuring the oven, just the electricity usage so if I turned on the kettle at the same time it could cause my guess to be incorrect. When CurrentCost produce their individual appliance monitors, I'll be able to be certain of how much electricity just the oven is using.

This uncertainty means that I only want to turn the oven monitor on when I've actually turned the oven on. Looking for an easy way to start the monitor, I spotted my house phone - a Siemens C460IP - which is a "normal" land line phone and an IP phone all in one. I've got Asterisk running on the same server as mosquitto, so it's an ideal solution for controlling things. Configuring Asterisk is way beyond the scope of this text, so I'm only going to talk about the bits I changed. I added a new extension number 100 which, when called, starts the oven monitor:

exten =&gt; 100,1,Answer()
exten =&gt; 100,n,System(echo "/usr/local/bin/oven_pub.pl" | at now)
exten =&gt; 100,n,Playback(oven-trigger)
exten =&gt; 100,n,Hangup

This answers the call, starts the monitor, plays a sound clip so the person calling knows what has happened and then hangs up. I'm using the "at" command here as a simple way of putting the job into the background, thanks to Ed for the suggestion. The script oven_monitor.pl looks for the electricity usage to drop beneath 2kW, then runs oven_warmed_up.sh and exits.

The final step is to do something in oven_warmed_up.sh to give feedback. I make use of asterisk once again and initiate a call to the phone - so when the oven has warmed up I get a phone call with a message that tells me so. The outgoing call is initiated by moving oven.call to /var/spool/asterisk/outgoing/, as shown in the script.

Do you have any suggestions on how to improve this? Or other ways of using asterisk or mqtt like this? Let me know in the comments!